Tag: leptonica

  • Accessing data of leptonica PIX data

    This is mainly as a reference

    
    /**
     * Get Pixel value at given  point
     */
    l_uint32 pixAtGet(PIX* pix, int_t x, int_t y)
    {
        l_int32 wpl    = pixGetWpl(pix);
        l_uint32* data = pixGetData(pix);
        l_uint32* line = data + y * wpl;
        l_uint32 value = GET_DATA_BYTE(line, x);
        return value;
    }


    To set a pixel value we can use this

    /**
     * Set Pixel value at given  point
     */
    void pixAtSet(PIX* pix, int_t x, int_t y, byte_t value)
    {
    	l_int32 wpl     = pixGetWpl(pix);
    	l_uint32* data  = pixGetData(pix);
    	l_uint32* line  = data + y * wpl;
    	SET_DATA_BYTE(line, x, value);
    }
    
  • Convert Leptonica PIX data into Java BufferedImage

    This snippet allows us to convert Leptonica PIX data into Java BufferedImage, in my case the pix->data could be compressed using zlib so I am decompressing before recreating image.
    We are assuming here that this is bi-tonal image(1 bpp)

    File used in example :

    Image represented by the data:
    binary

    Sample Usage

       byte[] zlibData = FileUtil.read("pix-compressed.txt");
       BufferedImage image = LeptonicaUtil.convert(zlibData, width, height, 1);
       ImageIO.write(image, "png", new File("C:/temp/test.png"));
    

    Code

    
    import java.awt.image.BufferedImage;
    import java.awt.image.WritableRaster;
    import java.io.ByteArrayOutputStream;
    import java.io.IOException;
    import java.nio.ByteBuffer;
    import java.nio.ByteOrder;
    import java.nio.IntBuffer;
    import java.util.zip.DataFormatException;
    import java.util.zip.Inflater;
    
    /**
     * Utility for help us work with leptonica pix data
     * @author gbugaj
     *
     */
    public class LeptonicaUtil
    {
    
        public static BufferedImage convert(byte[] indata, int width, int height, int depth)
        {
            try
            {
                // Decompress the bytes
    
                byte[] pixdata = zlibDecompress(indata);
    
                // 4 (4 Bytes per Int)
                int wpl = (width * depth + 31) / 32;
                int byteCount = 4 * wpl * height;
                int rowSize = 4 * wpl;
                assert (byteCount == pixdata.length);
    
                BufferedImage img = new BufferedImage(width, height, BufferedImage.TYPE_BYTE_BINARY);
                WritableRaster raster = img.getRaster();
                byte[] rasterdata = new byte[width * height];
                int rasterindex = 0;
    
                for (int h = 0; h < height; ++h)
                {
                    int start = h * rowSize;
                    byte[] row = new byte[rowSize];
                    System.arraycopy(pixdata, start, row, 0, rowSize);
                    // Convert row bytes into linedata using 4 bytes to represent a
                    // 32 bit int
                    IntBuffer intBuffer = ByteBuffer.wrap(row).order(ByteOrder.LITTLE_ENDIAN).asIntBuffer();
                    int[] linedata = new int[intBuffer.remaining()];
                    intBuffer.get(linedata);
                    for (int w = 0; w < width; ++w)
                    {
                        int word = w >> 5;
                        // need this to get proper byte ordering
                        int index = (31 - (w & 31));
                        byte val = (byte) (((linedata[word] >> index) & 1) ^ 1);
                        rasterdata[rasterindex] = val;
                        ++rasterindex;
                    }
                }
    
                raster.setDataElements(0, 0, width, height, rasterdata);
                return img;
            }
            catch (IOException e)
            {
                e.printStackTrace();
            }
            catch (DataFormatException e)
            {
                e.printStackTrace();
            }
            return null;
        }
    
        public static byte[] zlibDecompress(byte[] data) throws IOException, DataFormatException
        {
    
            /**
             * 78 01 - No Compression/low 78 9C - Default Compression 78 DA - Best
             * Compression
             */
    
            if (data.length < 2)
                return data;
    
            // Check magic headers
            if (!((data[0] & 0xff) == 0x78 && ((data[1] & 0xff) == 0x01 || (data[1] & 0xff) == 0x9C || (data[1] & 0xff) == 0xDA)))
            {
                return data;
            }
    
            Inflater inflater = new Inflater();
            inflater.setInput(data);
    
            ByteArrayOutputStream outputStream = new ByteArrayOutputStream(data.length);
            byte[] buffer = new byte[1024];
            int count = -1;
            while (!inflater.finished() && count != 0)
            {
                count = inflater.inflate(buffer);
                outputStream.write(buffer, 0, count);
            }
    
            inflater.end();
            outputStream.close();
            return outputStream.toByteArray();
        }
    }
    
    
  • Convert Leptonica PIX data to Java BufferedImage

    This snippet allows us to convert Leptonica PIX data into Java BufferedImage, in my case the pix->data could be compressed using zlib so I am decompressing before recreating image.
    We are assuming here that this is bi-tonal image(1 bpp)

    Sample Usage

       BufferedImage image = LeptonicaUtil.convert(zlibData, width, height, 1);
       ImageIO.write(image, "png", new File("C:/temp/test.png"));
    

    Code

    
    import java.awt.image.BufferedImage;
    import java.awt.image.WritableRaster;
    import java.io.ByteArrayOutputStream;
    import java.io.IOException;
    import java.nio.ByteBuffer;
    import java.nio.ByteOrder;
    import java.nio.IntBuffer;
    import java.util.zip.DataFormatException;
    import java.util.zip.Inflater;
    
    /**
     * Utility for help us work with leptonica pix data
     * @author gbugaj
     *
     */
    public class LeptonicaUtil
    {
    
        public static BufferedImage convert(byte[] indata, int width, int height, int depth)
        {
            try
            {
                // Decompress the bytes
    
                byte[] pixdata = zlibDecompress(indata);
    
                // 4 (4 Bytes per Int)
                int wpl = (width * depth + 31) / 32;
                int byteCount = 4 * wpl * height;
                int rowSize = 4 * wpl;
                assert (byteCount == pixdata.length);
    
                BufferedImage img = new BufferedImage(width, height, BufferedImage.TYPE_BYTE_BINARY);
                WritableRaster raster = img.getRaster();
                byte[] rasterdata = new byte[width * height];
                int rasterindex = 0;
    
                for (int h = 0; h < height; ++h)
                {
                    int start = h * rowSize;
                    byte[] row = new byte[rowSize];
                    System.arraycopy(pixdata, start, row, 0, rowSize);
                    // Convert row bytes into linedata using 4 bytes to represent a
                    // 32 bit int
                    IntBuffer intBuffer = ByteBuffer.wrap(row).order(ByteOrder.LITTLE_ENDIAN).asIntBuffer();
                    int[] linedata = new int[intBuffer.remaining()];
                    intBuffer.get(linedata);
                    for (int w = 0; w < width; ++w)
                    {
                        int word = w >> 5;
                        // need this to get proper byte ordering
                        int index = (31 - (w & 31));
                        byte val = (byte) (((linedata[word] >> index) & 1) ^ 1);
                        rasterdata[rasterindex] = val;
                        ++rasterindex;
                    }
                }
    
                raster.setDataElements(0, 0, width, height, rasterdata);
                return img;
            }
            catch (IOException e)
            {
                e.printStackTrace();
            }
            catch (DataFormatException e)
            {
                e.printStackTrace();
            }
            return null;
        }
    
        public static byte[] zlibDecompress(byte[] data) throws IOException, DataFormatException
        {
    
            /**
             * 78 01 - No Compression/low 78 9C - Default Compression 78 DA - Best
             * Compression
             */
    
            if (data.length < 2)
                return data;
    
            // Check magic headers
            if (!((data[0] & 0xff) == 0x78 && ((data[1] & 0xff) == 0x01 || (data[1] & 0xff) == 0x9C || (data[1] & 0xff) == 0xDA)))
            {
                return data;
            }
    
            Inflater inflater = new Inflater();
            inflater.setInput(data);
    
            ByteArrayOutputStream outputStream = new ByteArrayOutputStream(data.length);
            byte[] buffer = new byte[1024];
            int count = -1;
            while (!inflater.finished() && count != 0)
            {
                count = inflater.inflate(buffer);
                outputStream.write(buffer, 0, count);
            }
    
            inflater.end();
            outputStream.close();
            return outputStream.toByteArray();
        }
    }
    
    
  • Leptonica barcode generation

    Leptonica provides us with easy way to read barcodes but it does not offer a way to create them(as far as I know). Here is a leptonica function that will allow us to generate CODABAR barcode, in the feature I am planning on adding more type and more options but for now this was all I needed.

    Sample Usage

    l_int32 res = 300;
    l_int32 bar_width = .02 * res;
    l_int32 bar_height = .35 * res;
    
    // Barcode is bitonal
    PIX* barcode= pixCreateBarcodeCodebar("C3853110009C", bar_width, bar_height, 10, 10, 2, 2);
    if (barcode == NULL)
    {
    	printf("\n******** ERROR ***********");
    	return;
    }
    pixWritePng("c:/temp/barcode.png", barcode, 0);
    

    Implementation

    /**
     * Barcode Generator
     * @author : greg
     */
    #ifndef CREATEBARCODE_H_
    #define CREATEBARCODE_H_
    
    #include 
    
    #if !defined(LEPTONICA_ALLHEADERS_H)
    #   include 
    #endif
    
    #if !defined(LEPTONICA_READBARCODE_H)
    #	include 
    #endif
    
    /* ----------------------------------------------------------------- *
     * Codabar symbology                         *
     * Data  B  S  B  S  B  S  B   Value
     * 0     0  0  0  0  0  1  1     0
     * 1     0  0  0  0  1  1  0     1
     * 2     0  0  0  1  0  0  1     2
     * @ref http://www.barcodesymbols.com/codabar.htm
     * @ref leptonica/readbarcode.h
     * ----------------------------------------------------------------- */
    static const char *CodabarCodes[] =
    { "1111122", "1111221", "1112112", "2211111", "1121121", /* 0: 0 - 4      */
    "2111121", "1211112", "1211211", "1221111", "2112111", /* 5: 5 - 9      */
    "1112211", "1122111", "2111212", "2121112", "2121211", /* 10: -,$,:,/,. */
    "1121212", "1122121", "1212112", "1112122", "1112221" /* 15: +,A,B,C,D */
    };
    
    int mapCodebarToIndex(const char c)
    {
    	switch (toupper(c))
    	{
    	case '0':
    	case '1':
    	case '2':
    	case '3':
    	case '4':
    	case '5':
    	case '6':
    	case '7':
    	case '8':
    	case '9':
    		return atoi(&c);
    	case '-':
    		return 10;
    	case '$':
    		return 11;
    	case ':':
    		return 12;
    	case '/':
    		return 13;
    	case '.':
    		return 14;
    	case '+':
    		return 15;
    	case 'A':
    		return 16;
    	case 'B':
    		return 17;
    	case 'C':
    	case '*':
    		return 18;
    	case 'E':
    	case 'D':
    		return 19;
    
    	}
    	return 0;
    }
    
    /**
     * Crate 8 bpp Codebar barcode
     */
    PIX* pixCreateBarcodeCodebar(const char* code, l_int32 bar_width, l_int32 bar_height, l_int32 margin_left,
    		l_int32 margin_right, l_int32 margin_top, l_int32 margin_bottom)
    {
    	PROCNAME("pixCreateBarcodeCodebar");
    
    	printf("\n Rendering : %s", code);
    	//The width ratio between narrow and wide can be chosen between 1:2.25 and 1:3
    	l_float32 ratio = 2;
    	l_int32 width_wide = bar_width * ratio;
    	l_int32 narrow_space = bar_width;
    	// Calculate size
    	l_int32 size = 0;
    	for (int i = 0; code[i] != '\0'; ++i, ++size)
    	{
    		// NOOP
    	}
    	// allocate big enough image
    	PIX* pix = pixCreate(size * width_wide * 7, bar_height, 1);
    	pixSetResolution(pix, 300, 300);
    
    	l_int32 xpos = margin_left;
    	for (int i = 0; i < size; ++i)
    	{
    		const char* encoding = CodabarCodes[mapCodebarToIndex(code[i])];
    		for (l_uint16 j = 0; j < 7; j++)
    		{
    			l_int32 renderwidth = bar_width;
    			if (encoding[j] == '2')
    			{
    				renderwidth = width_wide;
    			}
    			if ((j % 2 == 0))
    			{
    				for (l_int32 k = 0; k < renderwidth; ++k)
    				{
    //					pixRenderLineArb(pix, xpos+k, 0, xpos+k, height, 1, 0, 0, 0);
    					pixRenderLine(pix, xpos + k, margin_top, xpos + k, bar_height - margin_bottom, 1, L_SET_PIXELS);
    				}
    			}
    			xpos += renderwidth;
    		}
    
    		// Each character is separated by narrow space
    		if (i < size - 1)
    			xpos += narrow_space;
    	}
    
    	// Clip
    	BOX* bounds = boxCreate(0, 0, xpos + margin_right, bar_height);
    	pix = pixClipRectangle(pix, bounds, NULL);
    	boxDestroy(&bounds);
    	return pix;
    }
    
    #endif /* CREATEBARCODE_H_ */


    I think I will make this my first GIT project and share it with all, trying to move away from google code.

  • Leptonica Tutorial – Cropping

    Common use is to crop to certain area of an image, this can be quite easily accomplished with following code.

    BOX* box = boxCreate(x, y, w, h);
    PIX* dpix= pixClipRectangle(spix, box, NULL);
    
  • Leptonica Tutorial – Environment setup

    Leptonica Development with Eclipse

    This is the first one of few tutorials that I am writring on using Leptonica image processing library

    Before we start let’s give credit where the credit is due, and this is goes out to Jay W.(need link) on which this instructions are largely based on.

    Environment

    • Eclipse
    • MinGW
    • Leptonica

    I assume that you have installed and configured Eclipse CDT (http://www.eclipse.org/cdt/) plugging for C/C++ development, as well as MinGW and can run simple c++ hello world using make file.

    Setup

    1. Lets start by downloading latest leptonica library from Leptonica download site
    and extract the library into your lib directory I use E:/source/c-libraries/leptonica-1.68

    2. This is probably the most complicated part of the setup, configuring the Eclipse environment and compiling Leptonica hello world project.

    1. Lets start by ‘Creating new C++ Make Project’ and naming it ‘HelloWorldLeptonica’ in Eclipse, before continuing lets make sure we can compile and run the project.
    2. Now we will edit Properties for our newly created project, navigate to Properties->C/C++ Build -> Environment
    and add new property LEPT_HOME

    LEPT_HOME E:/source/c-libraries/leptonica-1.67
    

    Include/Library Configuration

    Navigate to Properties->C/C++ General -> Paths and Symbols and select Include Tab -> GNU-C++
    and add new Include directory ‘E:/source/c-libraries/leptonica-1.67/include’, this will allow us to browse includes from within Eclipse.
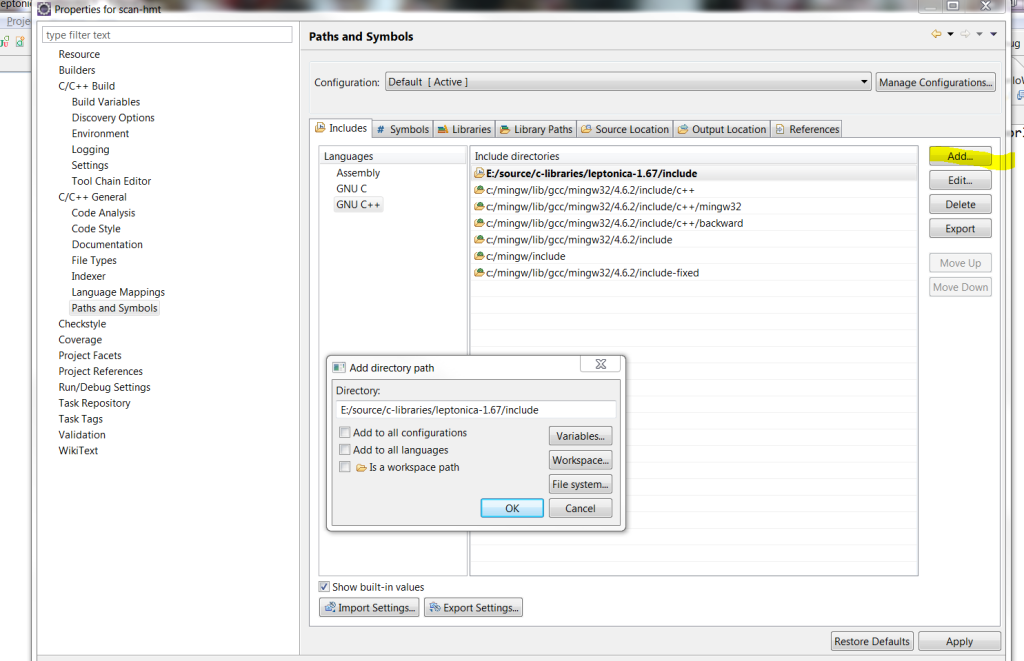
    Now lets copy leptonlib.dll from ‘E:/source/c-libraries/leptonica-1.67/lib’ into our project directory.
    this way we can run the project directly from Eclipse.

    Makefile Configuration

    I will highlight main sections that need to be configured, this is where we use our previously defined variable ‘LEPT_HOME’ come into play.

    • Include Files – INCS
    • Libraries – LIBS
    • Compiler Flags – CFLAGS

    We need to make sure to include header files and leptonica library.

    INCS		=	-I$(LEPT_HOME)/include		
    LIBS		=	-L$(LEPT_HOME)/lib		\
    			-lleptonlib			
    

    Capital flag -L indicates to includes $(LEPT_HOME)/lib directory in the search path, while lowercase -l indicates what library to load, if we wanted to include debug version we would use -lleptonlibd

    Here is a make file used by the demo project

    
    CFLAGS =	-O2 -g -Wall -fmessage-length=0
    CPP         =   g++
    OUTPUT_DIR	=	.
    OBJS		=	HelloWorldLeptonica.o
    INCS		=	-I$(LEPT_HOME)/include		
    LIBS		=	-L$(LEPT_HOME)/lib		\
    			-lleptonlib		
    PROJECT =	HelloWorldLeptonica.exe
    OUTPUT		=	$(PROJECT)
    
    all: $(PROJECT)
     
    $(PROJECT):	$(OBJS)
    	@echo Linking $(OUTPUT)
    	@$(CPP) $(LFLAGS) -o $(OUTPUT_DIR)/$(OUTPUT) $(OBJS) $(LIBS)
    	@echo Completed building $(OUTPUT)
     
    clean:
    	@echo Cleaning $(PROJECT)
    	@rm -rf $(OBJS) $(OUTPUT_DIR)/$(PROJECT) $(OUTPUT_DIR)/$(PROJECT).so $(PROJECT).so $(PROJECT) $(PROJECT).exe *.d
     
    -include $(OBJS:.o=.d)
     
    %.o:	%.cpp
    	@echo Compiling $<
    	@$(CPP) $(CFLAGS) -c $(INCS) -o $*.o $*.cpp
    	@$(CPP) -MM $(CFLAGS) $(INCS) $*.cpp > $*.d
     
    %.o:	%.c
    	@echo Compiling $<
    	@$(CC) $(CFLAGS) -c $(INCS) -o $@ $<
    	@$(CC) -MM $(CFLAGS) $(INCS) $*.c > $*.d


    Example

    As always we want to start with something simple so here is it, we get current directory and read in file a ‘test.png’ file, if all went well
    we display image dimensions.

    /**
     * Leptonica Hello World
     */
    #include 
    #include 
    #include 
    
    #include 
    #include 
    #include 
    
    #if !defined(LEPTONICA_ALLHEADERS_H)
    #   include 
    #endif
    
    int main(void) {
    	printf("\nTesting Leptonica Setup \n");
    
    	// Read test.png from current working directory
    	char* filename = NULL;
    	filename = getcwd(filename, MAXPATHLEN);
    	strcat(filename, "\\test.png");
    
    	PIX* pix = pixRead(filename);
    	if (!pix) {
    		printf("Error opening file");
    		return 1;
    	}
    	printf("Image width : %d", pix->w);
    	pixDestroy(&pix);
    	return 0;
    }
    

    If we want to build the project from outside of Eclipse you will have to define the the make file environmental variable in make file directly

     LEPT_HOME=E:/source/c-libraries/leptonica-1.67
    

    g++ and Eclipse debugging hint

    In am not an expert in c++ in any way so this can be totally wrong, but in order to get the debugger to work in eclipse
    the Compiler Flags (CFLAGS) need to be using -g -O0 instead of the default one -O2 -g.
    If we don’t do this then Eclipse complains that it can’t find the source when it hits a breakpoint.

    Download HelloWorldLeptonica Eclipse Project from here HelloWorldLeptonica

    At this point you should be ready to compile and run/debug leptonica project from within Eclipse IDE.

    As always comments and corrections are always welcome.