Common use is to crop to certain area of an image, this can be quite easily accomplished with following code.
BOX* box = boxCreate(x, y, w, h);
PIX* dpix= pixClipRectangle(spix, box, NULL);
Common use is to crop to certain area of an image, this can be quite easily accomplished with following code.
BOX* box = boxCreate(x, y, w, h);
PIX* dpix= pixClipRectangle(spix, box, NULL);
This is matlab function to calculate sum of A to N power using matrix diagonalization, it assumes that matrix is a square matrix.
function [x] = powersum(A, m)
% Greg Bugaj
 % Y = powersum(A, n) gives an sum of  matrices to N power, if matrix size
% is less than 2 then we simply return the input matrix
% Input : A - an nxn matrix
%         n - How many matrices to sum
%Output x - summed matrix to N power.
% P is our eigenvector, d is the diagonal to verify( inv(p)*A*p )
x = A;
[p d] = eigs(A);
for i = 2 : m
    % x = x+(A^i); -- Just raise to power and sum
    % note b * inv(A) is same as b/p
    x = x +  ((p * d^i) / p);
end
This is program demonstrates how to use ‘cpuid’ assembly instruction on x86 to retrieve cache line size. This is done in c++ and it uses the inline assembly to execute the instructions, compiled with gcc on win32.
Really we are only interested in Cache line information which can be found using 0x80000006 code and its lower 8 bits returned from ECX register.
#include
#include
#include

int MASK_LSB_8 = 0xFF;

void int2bin(int val) {
	char buffer[33];
	itoa(val, buffer, 2);
	printf("binary: %s\n", buffer);
}

// CPUID instruction takes no parameters as CPUID implicitly uses the EAX register.
// The EAX register should be loaded with a value specifying what information to return
void cpuinfo(int code, int *eax, int *ebx, int *ecx, int *edx) {
	__asm__ volatile(
			"cpuid;" //  call cpuid instruction
			:"=a"(*eax),"=b"(*ebx),"=c"(*ecx), "=d"(*edx)// output equal to "movl  %%eax %1"
			:"a"(code)// input equal to "movl %1, %%eax"
			//:"%eax","%ebx","%ecx","%edx"// clobbered register
	);
}

int main() {
	int eax = 0, ebx = 0, ecx = 0, edx = 0;
	//CPUID(0): Basic information
	cpuinfo(0x0, &eax, &ebx, &ecx, &edx);

	// check vendor [GenuineIntel, GenuntelineI] = ebx+ecx+edx
	char vendor[13] = { 0 };
	int identity_reg[3] = { ebx, ecx, edx };
	for (unsigned int i = 0; i < 3; i++) {
		for (unsigned int j = 0; j < 4; j++) {
			vendor[i * 4 + j] = identity_reg[i] >> (j * 8) & MASK_LSB_8;
		}
	}
	printf("\nVendor name = %s\n", vendor);

	//CPUID(0x80000000): Extended CPU information
	cpuinfo(0x80000000, &eax, &ebx, &ecx, &edx);
	int intelExtended = eax & MASK_LSB_8;
	printf("\nMax feature id = %d\n", intelExtended);
	if (intelExtended < 6) {
		printf("\nCache Extended Feature not supported");
		return 0;
	}
	// CPUID(0x800000006): Cache line information
	cpuinfo(0x80000006, &eax, &ebx, &ecx, &edx);
	// We are only interested in lower 8 bits
	printf("\nL2 Cache Size = %d\n", (ecx & MASK_LSB_8));
}
Here is the output from my machine.
Vendor name = GenuntelineI
Max feature id = 8
L2 Cache Size = 64
The following result can be verified by using cpu-z program.
  	L1 Data cache	4 x 32 KBytes, 8-way set associative, 64-byte line size
    	L1 Instruction cache	4 x 32 KBytes, 8-way set associative, 64-byte line size
    	L2 cache	4 x 256 KBytes, 8-way set associative, 64-byte line size
    	L3 cache	6 MBytes, 12-way set associative, 64-byte line size
This is the first one of few tutorials that I am writring on using Leptonica image processing library
Before we start let’s give credit where the credit is due, and this is goes out to Jay W.(need link) on which this instructions are largely based on.
I assume that you have installed and configured Eclipse CDT (http://www.eclipse.org/cdt/) plugging for C/C++ development, as well as MinGW and can run simple c++ hello world using make file.
1. Lets start by downloading latest leptonica library from Leptonica download site
and extract the library into your lib directory I use E:/source/c-libraries/leptonica-1.68
2. This is probably the most complicated part of the setup, configuring the Eclipse environment and compiling Leptonica hello world project.
1. Lets start by ‘Creating new C++ Make Project’ and naming it ‘HelloWorldLeptonica’ in Eclipse, before continuing lets make sure we can compile and run the project.
2. Now we will edit Properties for our newly created project, navigate to Properties->C/C++ Build -> Environment
and add new property LEPT_HOME
LEPT_HOME E:/source/c-libraries/leptonica-1.67

Navigate to Properties->C/C++ General -> Paths and Symbols and select Include Tab -> GNU-C++
and add new Include directory ‘E:/source/c-libraries/leptonica-1.67/include’, this will allow us to browse includes from within Eclipse.
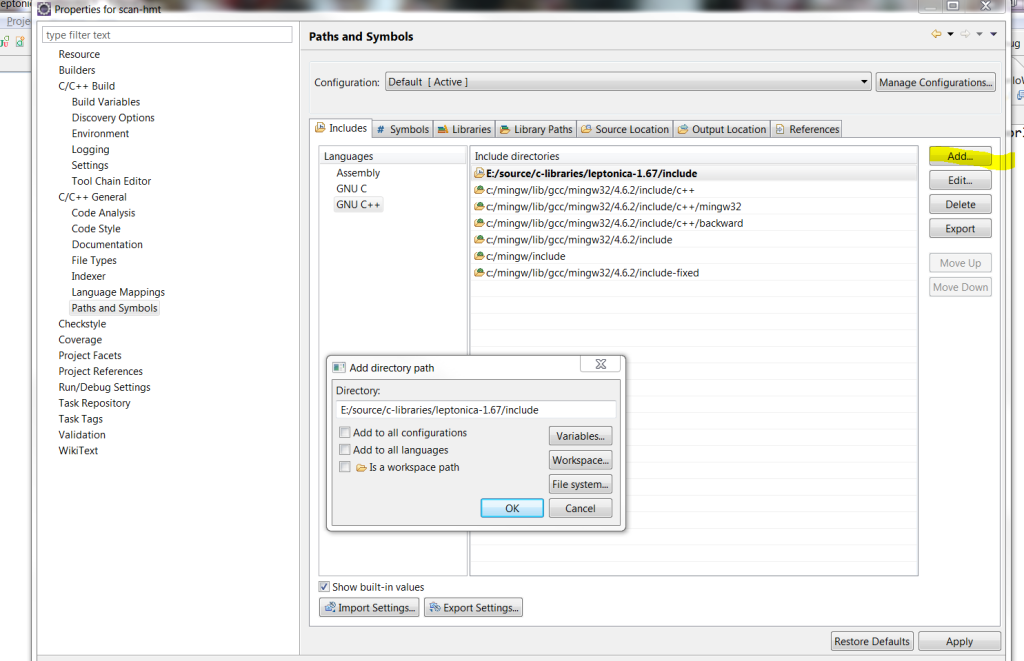
Now lets copy leptonlib.dll from ‘E:/source/c-libraries/leptonica-1.67/lib’ into our project directory.
this way we can run the project directly from Eclipse.
I will highlight main sections that need to be configured, this is where we use our previously defined variable ‘LEPT_HOME’ come into play.
We need to make sure to include header files and leptonica library.
INCS		=	-I$(LEPT_HOME)/include
LIBS		=	-L$(LEPT_HOME)/lib		\
			-lleptonlib
Capital flag -L indicates to includes $(LEPT_HOME)/lib directory in the search path, while lowercase -l indicates what library to load, if we wanted to include debug version we would use -lleptonlibd
Here is a make file used by the demo project
CFLAGS =	-O2 -g -Wall -fmessage-length=0
CPP         =   g++
OUTPUT_DIR	=	.
OBJS		=	HelloWorldLeptonica.o
INCS		=	-I$(LEPT_HOME)/include
LIBS		=	-L$(LEPT_HOME)/lib		\
			-lleptonlib
PROJECT =	HelloWorldLeptonica.exe
OUTPUT		=	$(PROJECT)

all: $(PROJECT)

$(PROJECT):	$(OBJS)
	@echo Linking $(OUTPUT)
	@$(CPP) $(LFLAGS) -o $(OUTPUT_DIR)/$(OUTPUT) $(OBJS) $(LIBS)
	@echo Completed building $(OUTPUT)

clean:
	@echo Cleaning $(PROJECT)
	@rm -rf $(OBJS) $(OUTPUT_DIR)/$(PROJECT) $(OUTPUT_DIR)/$(PROJECT).so $(PROJECT).so $(PROJECT) $(PROJECT).exe *.d

-include $(OBJS:.o=.d)

%.o:	%.cpp
	@echo Compiling $<
	@$(CPP) $(CFLAGS) -c $(INCS) -o $*.o $*.cpp
	@$(CPP) -MM $(CFLAGS) $(INCS) $*.cpp > $*.d

%.o:	%.c
	@echo Compiling $<
	@$(CC) $(CFLAGS) -c $(INCS) -o $@ $<
	@$(CC) -MM $(CFLAGS) $(INCS) $*.c > $*.d
As always we want to start with something simple so here is it, we get current directory and read in file a ‘test.png’ file, if all went well
we display image dimensions.
/**
 * Leptonica Hello World
 */
#include
#include
#include

#include
#include
#include

#if !defined(LEPTONICA_ALLHEADERS_H)
#   include
#endif

int main(void) {
	printf("\nTesting Leptonica Setup \n");

	// Read test.png from current working directory
	char* filename = NULL;
	filename = getcwd(filename, MAXPATHLEN);
	strcat(filename, "\\test.png");

	PIX* pix = pixRead(filename);
	if (!pix) {
		printf("Error opening file");
		return 1;
	}
	printf("Image width : %d", pix->w);
	pixDestroy(&pix);
	return 0;
}
If we want to build the project from outside of Eclipse you will have to define the the make file environmental variable in make file directly
LEPT_HOME=E:/source/c-libraries/leptonica-1.67
In am not an expert in c++ in any way so this can be totally wrong, but in order to get the debugger to work in eclipse
the Compiler Flags (CFLAGS) need to be using -g -O0 instead of the default one -O2 -g.
If we don’t do this then Eclipse complains that it can’t find the source when it hits a breakpoint.
Download HelloWorldLeptonica Eclipse Project from here HelloWorldLeptonica
At this point you should be ready to compile and run/debug leptonica project from within Eclipse IDE.
As always comments and corrections are always welcome.
Well here is my way on how to handle the ENTER key on the TextBox in asp.net so it execute my method call instead the default form action.
I have a textbox and a linkbutton that invokes the search, but I also would like to hook up to that linkbutton when I press ENTER on the TextBox so I would perform the search, but by default it would invoke the form submit which is not what we want. So here is a quick solution using javascript, I know there are other one but this one is short and it works well.
There are many ways to accomplish this but this one does not use any external dependencies like Apache commons.
Two common pitfalls that I see are that people forget to flush the ByteArrayOutputStream and they call ‘baos.write(buffer)’ instead of ‘baos.write(buffer, 0, read)’ without actually clearing the buffer, which causes the last write to append previous bytes if the read returned less than what has been read from the input stream.
	private String extract(InputStream inputStream) throws IOException {
		ByteArrayOutputStream baos = new ByteArrayOutputStream();
		byte[] buffer = new byte[1024];
		int read = 0;
		while ((read = inputStream.read(buffer, 0, buffer.length)) != -1) {
			baos.write(buffer, 0, read);
		}
		baos.flush();
		return  new String(baos.toByteArray(), "UTF-8");
	}
Sometimes its nice to be able to transfer object between request or for flash messages without need for a whole session. Here we will use session as our store mechanism for our flash scope. This concept here can be extended into implementing a ‘Conversation Scope’ but that is a whole different animal.
 @FlashAttribute(TABNAME_ATTRIB)
 public String getTabName() {
   return tabObject;
 }
Title might be little misleading since in java we pass always by value, but we can mimic passing by reference.
/**
 * This class allows us to pass values by reference ranter than value.
 * Not directly as java just passes reference of the object by value but indirecly
 * @author Greg
 *
 * @param
 */
public class IndirectReference {
	public E ref;

	public IndirectReference(E ref) {
		this.ref = ref;
	}

	public void set(E ref) {
		this.ref = ref;
	}
}
Just a snippet copied from my interpreter
	IndirectReference signal = new IndirectReference(ControlSignal.NOOP);
	if(signal.ref == ControlSignal.BREAK){
	    break;
	}
While using HTML Tidy I needed to remove the DOCTYPE prolog to prevent
‘org.xml.sax.SAXParseException: Already seen doctype.’ exception.
Regex is quite simple, only catch is that we need to make sure we include the \n\r in our selecton and make it not greedy.
convertedData = convertedData.replaceAll("", "");
This will consume multiline as well as single declarations
/*

*/
This is snipper of my ANTLR grammar for parsing expressions with operator precedence,
By default the expressions are evaluated left to right which in some cases may produce undesired results, in order to fix that use of left and right parenthesis is required.
For example this two expressions will be evaluated differently
 3 > 2 > 1

 3 > (2 > 1)
&&

||

< > <= >=

^

*/

+-
According to ANTRL author currently we need a new rule for each precedence , which make is really messy but its not too bad after you get a hand of it. This grammar includes rewrite rules to generate our Abstract Syntax Tree(AST)
expression
	: subExpr -> ^(EXPR subExpr)
	;

subExpr : logicalAndExp (addSubtractOp^ logicalAndExp)*
	;

logicalAndExp
	: logicalOrExp (multiplyDivideOp^  logicalOrExp)*
	;

logicalOrExp
	: comparatorExp (CARET^  comparatorExp)*
	;

comparatorExp
	: powExp (comparatorOp^  powExp)*
	;

powExp 	: multExp (BARBAR^   multExp)*
	;

multExp
	:  expressionAtom (AMPAMP^ expressionAtom)*
	;

expressionAtom
	:
	|   NUMBER
	|  ( LPAREN! subExpr^ RPAREN! )
	|   VARNAME
	|   function
	;


addSubtractOp
	:	PLUS
	|       MINUS
	;

multiplyDivideOp
	:	STAR
	|       SLASH
	;

comparatorOp
	:	GT
	|       LT
	| 	GTE
	|	LTE
	|	NEQ
	;
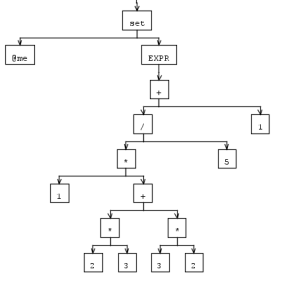
As stated before following two expression produce two different AST, ignore the semantics of the operators as they are only to show proper AST construction.
 3 > 2 > 1

 3 > (2 > 1)
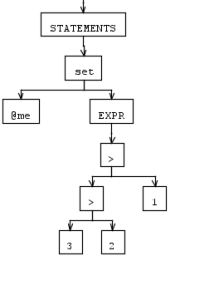
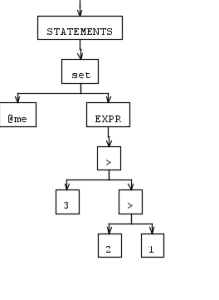
Here is a expression parsed left to right
set @me = 1+2+3*2
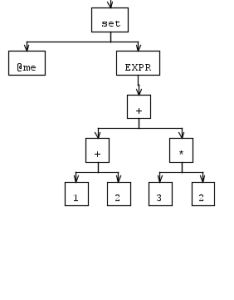
Here is a more complex expression that shows precedence and parenthesis operations
set @me = 1*(2*3 + 3*2)/5+1
I think that for next post I will show on how to evaluate given expressions, also I am always looking for suggestions and comments